Thursday, October 6, 2011

Door Jamb Jam

Painting all of the trim in our house has also caused me to paint the doors as well.  Of course, things never go back on as easily as they came off.  After I hung the door in our spare bedroom it wouldn't stay closed.  After several attempts at loosening, straightenting, and tightening the hinges (x23) I was frustrated. Then I realized that it wasn't the hinges, it was the strike plate. Here's a little trick for moving the strike plate from a previous position.

First dip several toothpicks in wood glue and stuff in the hole that you are trying to fill. It should be a very snug fit.  It's okay if they don't fit in there evenly.


Let it dry for 24 hours.  Then simply snap off the toothpicks at the base.


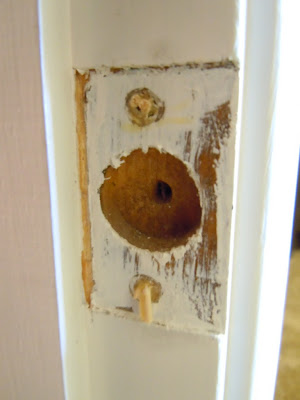
This leaves a very rough edge.  Use a chisel to level the toothpick flush with the door jamb. If your chisel is sharp you should be able to take care of it in one blow.


Now it's time to put the strike plate back on.  I chose to tape the strike plate in place so I knew it would not move while I was putting the new screws in.


This worked like a charm and the door closed perfectly.

Tuesday, October 4, 2011

Updated Ceiling Fan on the Cheap

One of the very first projects I worked on when we moved into our home was updating a few of the ceiling fans.  There wasn't a thing wrong with them except, well...THIS!


So, about the only thing right was that is worked.  I disassembled as many pieces as I could.  I found that spraying each individual piece created a more professional look instead of taking a can of spray paint to the whole fixture.  The screws were stuck in pieces of styrofoam for spraying. I wiped down each piece to remove the last 25 years of dust off.  I did not sand or prime before I sprayed the metal areas. 

Notice the gold detail on the blades?  Major yuck!  I simply sanded the surfaces to remove any finishes and stained with Minwax Dark Walnut stain.  I did flip the blades over so that all shades of gold are now on the top side.  


The only money I spent on the project was the new glass shades that ran $7 each.  I have since found a place to buy them cheaper.  This project didn't go without it's excitement though.  Upon re-hanging the fixture and flipping the breaker, something went "POP" and I might have seen a bit of smoke.  My husband suggested that maybe I shouldn't be doing electrical work in out home.  It's not stopped me yet.

Thursday, September 15, 2011

Fast Fireplace Fix...Part 2

I hope you check out Part 1 to see what disgust I was dealing with.  Hello 1983! Updating the fireplace was so easy.  It was complete within a couple of hours.  The after pictures don't show how great it really looks.  It's a beautiful matte paint and will be very easy to touch up should any scratches happen.  I also sprayed the screens to make them look tip-top.  It looks brand new!

After posting this I can see some spots that need a touch up that were not visible otherwise.  Gee, thanks for the compliments camera!

source
I used Rust-oleum's High-Heat spray paint.  The color used was Bar-B-Que Black.  It's safe up to 1200°.  Let's hope our fireplace doesn't reach anywhere near that temperature.  You will find that using a trigger attachment when spray painting will relieve the stress on your pointer finger.  I know you've abused your finger...what did it ever do to you?

What recent updates have you done that are quick and effective?

Linking to


Tuesday, September 13, 2011

Fast Fireplace Fix...Part 1

Since  Mr. Study is opposed to me taking a jackhammer to our fireplace (I can't see why), I had to get creative. While the fireplace has never been a top priority I knew I could change one thing real quick with a can of spray paint. Enter 1983 fireplace!
 
Holy yuck!  I've never liked this look, who does?!  The four vents on the sides are supposed to work as fans and blow out hot air when the fire place is going. Yes, the fans blow.  But they have about as much forced air as your whistler does.  Something was engineered all wrong! While there is no quick fix for that.  I did get rid of 1983.

First I covered the area with paper to avoid spraying the brick and glass. Thank you Martha for the great magazine.

Then I built a tent.  To avoid black overspray on everything in the vicinity I created a spray booth...kind of.  It worked for the first bit, but was tricky.  I had to cut some slits in the plastic to allow my hand to slip in and spray.  Let's just say I should have worn a glove.  Eventually I had to remove the tent and spray with wild abandon to get an even coat.

Stay tuned for the finished look!


Sunday, September 11, 2011

My 9/11

The term 9/11 needs no explanation.  It needs no long story.  Everyone will remember something about that day.  For me, I was 17 years old and being homeschooled as a senior in high school.  My mom had started making a birthday breakfast for my younger sister.  I went to turn on the news.  The first image I saw was the first tower burning.  I thought it was a trailer for a new movie, until I saw the word "live" etched in the corner of the screen.  Our family gathered in the living room in disbelief.  I vividly remember my Pops saying, "that has to be the work of Osama bin Laden.  Remember his attack against the USS Cole?"  He could not have been more right. 

Our worlds changed after that day. Not only in the predictable ways, but in a sense that Americans have a greater pride for their country, for their flag, for their military. I can barely get through hearing the national anthem without my eyes welling with tears, I have a continual heart of thanksgiving for our service men and women who sacrifice everything they have, and my heart bursts with pride at the sight of the American flag.

Thank you to many friends and family in the military.  A special thank you to my sister who is currently serving in Saudi Arabia after a tour of duty in Afghanistan. I'm so proud of her!


Monday, August 15, 2011

Buffet...Now Entertainment Center

There is a large wall in our living room that was calling for a big piece of furniture to fill it up.  I was considering using the buffet but knew it would not be large enough.  I decided I'd find a hutch top to use.  I didn't know what I was looking for, but knew this was it when I stumbled upon it a few days later.

We purchased this at an antique store just down the road from us.  I can imagine that it was a beautiful piece in it's day.

After purchasing the hutch I wasn't sure if I was ready to commit.  After a few hours and exchanged photos with my sisters, I was reassured I needed to do this.

We started by removing the tracks for the drawers to create shelving. Wood was cut to provide support for the electronics on the shelves. Then it was all stained with Minwax Dark Walnut with a cherry shade that was left by the previous home owners.  It was a GREAT match! We also went as far as drilling round holes for cords and purchased plastic caps to protect the wood.  Let me tell you, that was the hardest part of the project.  I hated drilling a 1 inch hole into the back of that beautiful hutch!  There is even a fan installed int he back of the buffet to allow air flow.
The buffet received new coat of paint in a softer hue.  This color was carried on to the outside of the hutch.  It is so functional and perfect for the space.  We did save the drawers and tracks, JUST IN CASE!

Furniture Feature Fridays

Wednesday, August 10, 2011

Estate Sale Find

My husband and I enjoy frequenting sales. At one of the first sales we went to after we were married, he spotted this beauty! The finish was rough, uh..shot! But she was strong and sturdy.


After sanding, I gave it one coat of Kilz and two coats of Ace Cabinet, Door, and Trim Paint. Because I knew this piece would receive alot of use I wanted a finish that would stay perfect.


Working on this piece really got me hooked renovating furniture! I loved seeing how something so ugly could go through so many transformations.

This buffet was used for awhile then it went through another transformation. Check out my next post to see it's new and improved use!